A Rainy Afternoon, One Box of Paper Scraps
Make reusable gift tags from clean paper scraps with a small, fixed set of tools, simple preparation and a format suited to each kind of offcut.
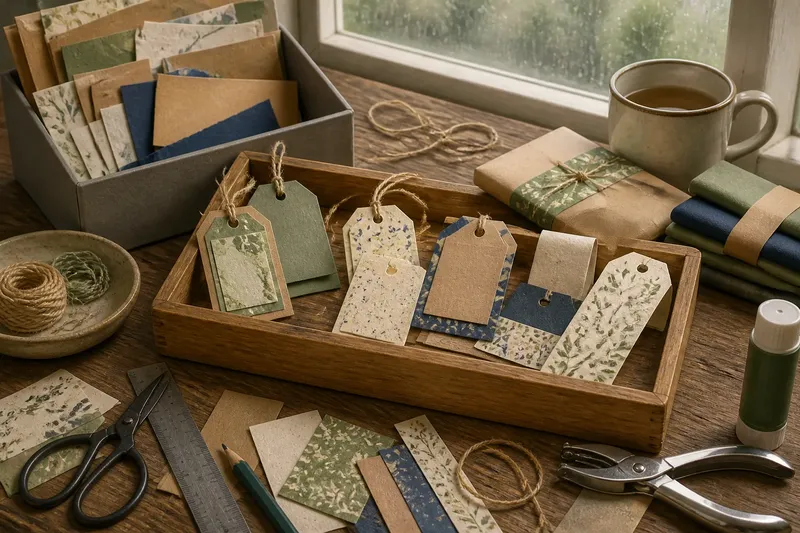
A rainy afternoon and a box of paper scraps can make a useful set of reusable gift tags—without turning the table into a craft shop. The trick is to choose a tag style that suits the scraps you already have, then set a modest limit on tools, preparation and finished pieces.
Three approaches work particularly well: folded card tags, layered tags and simple paper bands. Each makes a different kind of scrap useful. Pick one style for the session, or let everyone choose from two if the box contains several shapes and thicknesses.
What should one afternoon produce?
A small, coherent set is more useful than a pile of experiments. Aim for enough tags to keep with wrapping supplies, but stop when the chosen scraps are gone or the session’s time is up. The limit is part of the design: it makes decisions easier and leaves the rest of the box available for another project.
Gather clean paper offcuts, scissors, a pencil, a ruler, a hole punch if you have one, and string or ribbon already in the house. A glue stick is useful for layered tags, but it is not essential for every approach. Keep the materials on a tray or in one shallow box so the working area remains easy to clear.
Use scraps that are dry and clean, with enough strength to survive handling. An old envelope, a leftover piece of gift wrap backed with card, or a clean section of a paper bag may suit. Skip greasy, damp, mouldy or heavily inked pieces, and avoid paper that flakes or tears as soon as it is handled.
Which tag style suits your scraps?
Would folded card tags suit thicker offcuts?
Folded tags turn a small, sturdy rectangle into a little card with a blank inside for a name or message. They suit leftover card from packaging, greeting cards, or other firm paper that bends neatly without splitting. Cut each piece to a size that feels comfortable in the hand, fold it in half, and add a hole near the folded edge if you want to tie it on.
The fold gives the tag more body and hides a plain or uneven reverse. It also creates space for a short message without needing another piece of paper. If a scrap is too thick to fold cleanly, set it aside for a flat tag rather than forcing a crease that cracks.
Are layered tags best for mixed paper scraps?
Layered tags let a thin or patterned offcut sit on a firmer backing. Cut both pieces into simple shapes, then use a small amount of glue to attach the decorative piece. A plain backing can show around the edge, giving a ragged scrap a tidy border without requiring exact cutting.
This approach suits someone who enjoys choosing colour combinations and has a glue stick to hand. It takes longer than making a flat tag, and the extra layer uses more material, so keep it for scraps that are too flimsy or visually busy on their own. A narrow strip or small patch can be enough; there is no need to cover the whole surface.
Could paper bands work better than tags?
A paper band wraps around a small parcel or a folded cloth gift, carrying the message on its outside. Cut a long strip from a suitable offcut, write the recipient’s name on it, and overlap the ends around the parcel. A removable paper clip or a loop of string can hold it in place if the band does not stay put by itself.
Bands suit long, narrow scraps that would be awkward as tags. They are also useful when a parcel has no convenient place to tie a label. Choose this option only for gifts whose shape and wrapping can hold a band gently; a band that slips or buckles is more fuss than a separate tag.
How should the session be prepared?
Set the box on the table and sort only enough to make the choice clear: firm pieces, thin or patterned pieces, and long strips. This is not a full household paper audit. If a scrap does not seem suitable for the selected style, return it to the box rather than making a new category or searching for a use on the spot.
Choose a simple shape before cutting. Rectangles and clipped corners are easy to repeat; a rounded corner can be made with scissors if the paper handles it well. A ruler is handy for straight edges, but careful freehand cutting is fine for a relaxed set. Use a template only if matching shapes matter to you.
Keep decoration to what is already available: a pencil drawing, a short handwritten message, a small paper patch or a coloured strip. Skip wet paint, glitter and elaborate add-ons for this session. They bring extra supplies and drying or clean-up work to a project whose charm is making use of what is already there.
Before cutting, decide where the finished tags will live. A small envelope, an empty tin or a section of the same scrap box can keep them together with spare string. If there is no practical place to store them, make fewer. The point is to have ready-to-use tags, not to create another container that needs organising.
What happens in a short worked example?
Say a household opens a box containing a firm piece of card, several patterned wrapping-paper offcuts and a few long strips. They choose layered tags because the patterned pieces are attractive but too delicate to use alone. With scissors, a pencil, a ruler and a glue stick, they cut a handful of simple backing shapes, add smaller patches, punch holes where possible and tie on string saved from a parcel.
The expected result is a small group of coordinated tags, each sturdy enough to write on and ready to join the wrapping supplies. The long strips stay in the box for a later band-making session rather than being trimmed into a shape they do not suit. That decision keeps the afternoon focused and the useful scraps intact.
How do you keep the tags useful?
Leave a clear area for names or messages. A patterned panel can be decorative, but writing across a busy print may be hard to read. Place the blank space on the reverse, inside a folded tag, or on the backing of a layered one.
For a tag intended to be used again, avoid writing directly on the surface if the name can go on a separate small slip. A removable slip can be tucked beneath a loop of string or attached with a paper clip. Reuse will depend on the paper’s condition and the way the tag is handled, so reserve the sturdiest pieces for gifts likely to travel or be passed around.
Store the tags flat and dry, with the string beside them rather than knotted through every hole. That makes it easier to take one when needed and reduces the chance of bent corners. If a tag becomes torn or marked, it can still serve as a backing or be returned to paper recycling where local arrangements accept it.
There is little value in making every scrap match, buying special punches, or decorating each tag until no blank writing space remains. The scraps are already the material; a small set of scissors and a clear choice of format are usually enough.
Which approach should you choose for your paper scraps?
Choose folded card tags when most pieces are firm and you want a message inside. Choose layered tags when the best-looking scraps are thin, patterned or uneven. Choose paper bands when the box holds long strips and the gifts are shaped to hold them. If the box contains a mixture, make one style now and save the unsuitable pieces for another rainy afternoon.
For reusable gift tags, the most helpful measure is not how many scraps disappear, but whether the finished pieces are easy to find and pleasant to use. Keep the session small, stop before the materials spread beyond the table, and let the paper’s shape decide what it becomes.